
The information in this blog was correct at the time of writing but it is now superseded by release of a new MarkLogic Docker image on dockerhub. See MarkLogic on Docker for more details.
If you work in or with IT, chances are you’ve heard the buzz over Docker and container technology. Containers are alternatives to virtual machines, providing isolation for applications and also a method of delivering microservices. If you’re interested in learning how MarkLogic can be setup using Docker, or how a 3-node cluster in MarkLogic can be set-up using docker-compose, continue reading!
MarkLogic officially supports Docker containers with version 9.0-5 or later. Please use discretion when working with these examples using older versions of MarkLogic.
What is Docker?
Docker is an environment for creating and managing containers. Containers package up applications and their runtime dependencies. All containers share the same Linux kernel, separated by Linux namespaces and resource control groups (cgroups). Containers share their host’s memory, cpus, and storage. Of course, they differ from Virtual Machines (VMs) because VMs virtualize all of a computer’s hardware. Imagine that you need a new room for your house. Docker containers would add a new room to your existing house, sharing the house’s electricity, plumbing and heating. Virtual Machines, on the other hand, would build a new house every time a new room is required.
Why MarkLogic and Docker
Running MarkLogic in Docker containers keeps MarkLogic versions isolated from each other. You can spin up a MarkLogic container in a matter of seconds compared to the time needed for virtual machines to begin. Docker containers communicate with each other over a private Docker bridged network so MarkLogic containers can be easily clustered without much network overhead. In order to setup Docker on your machine, please visit Docker’s website.
Creating a MarkLogic Docker Container
The first thing needed to create a container is a Dockerfile, which is a text file containing Docker commands. These commands tell Docker how to build an image from which containers are created.
Since Docker is a Linux technology, we’ll be using CentOS 7 as a base image to build upon. We’ll also need to download MarkLogic Server and the Red Hat 7 / CentOS 7 installer. We are using MarkLogic Version 8.0-5.5 in this example, but you can use any MarkLogic version 8+. If you are new to MarkLogic, see our Introduction to MarkLogic On-Demand videos (available in multiple languages) and or get them via the MarkLogic University’s Mobile App available on Apple’s App Store and on Google Play.
First, we are going to see a sample Dockerfile to create a MarkLogic image.
An Example MarkLogic DockerFile
FROM centos:centos7

# Get any CentOS updates then clear the Docker cache
RUN yum -y update && yum clean all

# Install MarkLogic dependencies
RUN yum -y install glibc.i686 gdb.x86_64 redhat-lsb.x86_64 && yum clean all

# Install the initscripts package so MarkLogic starts ok
RUN yum -y install initscripts && yum clean all

# Set the Path
ENV PATH /usr/local/sbin:/usr/local/bin:/usr/sbin:/usr/bin:/sbin:/bin:/opt/MarkLogic/mlcmd/bin

# Copy the MarkLogic installer to a temp directory in the Docker image being built
COPY MarkLogic-RHEL7-8.0-5.5.x86_64.rpm /tmp/MarkLogic.rpm

# Install MarkLogic then delete the .RPM file if the install succeeded
RUN yum -y install /tmp/MarkLogic.rpm && rm /tmp/MarkLogic.rpm

# Expose MarkLogic Server ports
# Also expose any ports your own MarkLogic App Servers use such as
# HTTP, REST and XDBC App Servers for your applications
EXPOSE 7997 7998 7999 8000 8001 8002

# Start MarkLogic from init.d script.
# Define default command (which avoids immediate shutdown)
CMD /etc/init.d/MarkLogic start && tail -f /dev/null
Docker is a Linux technology and MarkLogic runs on top of Linux in Production. Docker doesn’t use Windows or Mac OSX as a base OS (yet). Let’s try debriefing the Dockerfile above:
- First, we let Docker know that we are building this image on top of a previously created CentOS 7 image called
centos:centos7. If that image isn’t available locally, Docker will search its repository and download it. - Next, we use Docker’s
RUNcommand to get any CentOS 7 updates. Theyum clean allcommand cleans up any yum cache to help keep our image a reasonable size. - The base CentOS 7 image doesn’t contain the initscripts package. MarkLogic uses an init.d script to start the MarkLogic Server. So again, we
RUNyum to install the needed package. - The Docker
ENVcommand sets any desired environment variables in the image. We are setting the search path, including MarkLogic. - The
COPYcommand copies the MarkLogic Red Hat 7 installer to a temporary directory in the image. - Then, of course, MarkLogic needs to be installed. After the installation is successful, we delete the Marklogic installer from the temporary directory in the image since we won’t be needing it.
- Docker has its own networking. Containers can communicate with other containers. So we
EXPOSEto Docker the ports MarkLogic uses. The MarkLogic knowledgebase lists the ports used by MarkLogic for host-to-host and cluster-to-cluster communication.We want these ports exposed to Docker networking:
| Port | Purpose |
|---|---|
| 7997 | Default HealthCheck application server port and is required to check health/proper running of a MarkLogic instance. |
| 7998 | Default foreign bind port on which the server listens for foreign inter-host communication between MarkLogic clusters. |
| 7999 | Default bind port on which the server listens for inter-host communication within the cluster. The bind port is required for all MarkLogic Server Clusters. |
| 8000 | Default App-Services application server port and is required by Query Console. |
| 8001 | Default Admin application server port and is required by the Administrative Interface. |
| 8002 | Default Manage application server port and is required by Configuration Manager and Monitoring Dashboard. |
- Finally, the
CMDcommand is executed when containers are created, then the container exits. We want to start MarkLogic but we don’t want the container to exit. So the CMD in the Dockerfile simply starts MarkLogic then attempts to read from the file,/dev/nulland show each new entry at the end of that file. Since the file doesn’t exist, it will simply wait forever.
You can copy the above commands and paste them into a blank text file. Save the file as Dockerfile. Copy the MarkLogic RPM file that you downloaded to the same directory and you are ready to build your MarkLogic Docker image.
Building the MarkLogic Docker Image
Docker uses the commands in the Dockerfile to create a Docker image when using Docker’s build command:
docker build .The Dockerfile is traditionally called Dockerfile, and is located in the current directory. You can specify a Dockerfile location by using the -f flag:
docker build -f /path/to/Dockerfile .Let’s build a MarkLogic image and give it a name by using the -t flag. Ensure that the MarkLogic .rpm installer is in the same path as your Dockerfile and the name matches with the COPY command within the Dockerfile. Then use the following Docker command:
docker build -t marklogic:8.05-preinitialized .This command creates an image with the given name of marklogic:8.05-preinitialized. Everything after the “:” in the name is called a tag. (Tags in Docker are helpful to differentiate images such as MarkLogic versions.)
Docker lets us know when the image is successfully built:
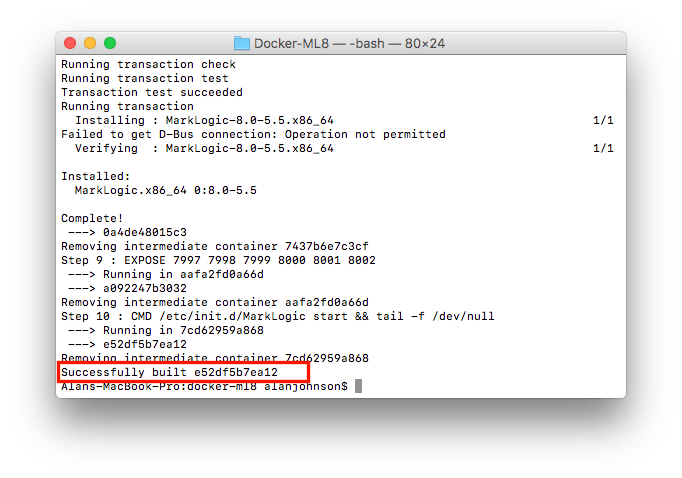
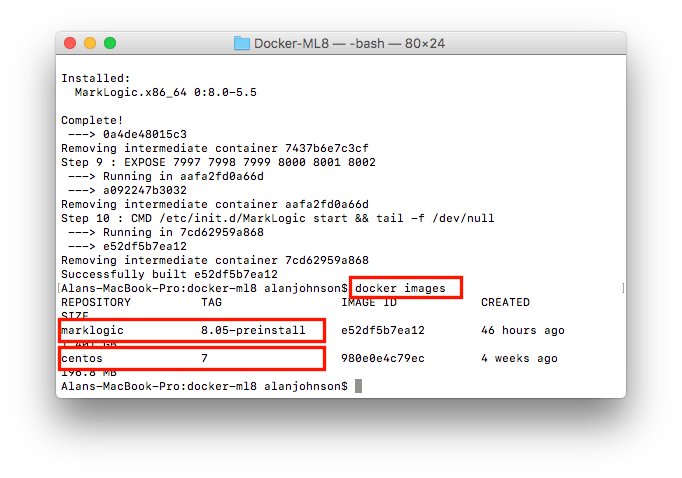
Use the docker images command to list all of your Docker images.
Creating a Container
A Docker container is a running instance of an image. MarkLogic containers can be created then stopped when no longer needed. The MarkLogic container can then be started again in the same state as when it was stopped. Multiple MarkLogic containers can be created if you wanted to cluster them.
Use the docker run command to create a MarkLogic container from a Docker image. Flags specify the ports to open from the host computer into the Docker container. For example, we’d want to contact each MarkLogic container’s Admin Interface on port 8001 so we can configure and monitor MarkLogic running in that container.
It’s important to remember that Docker shares the host computer’s resources, including its networking. If a Docker container uses port 8001, that port is not available on the host computer. Fortunately, the docker run command has flags to control which port on the host maps to ports in the Docker container. So we could have one MarkLogic container with the Admin Interface that’s available on the host’s port 8001 and another MarkLogic container with its Admin Interface available on the host’s port 18001. Within each container, MarkLogic is still listening on port 8001. The Docker networking takes care of whatever host to container port mapping we may choose.
The image we’ve created has MarkLogic, but it has not been through the post-installation steps. To begin finishing up the MarkLogic installation process, we need to create a MarkLogic container that exposes port 8001
Make sure you don’t have MarkLogic or any other service on your host computer using port 8001. Then type in the following on the command prompt:
docker run -d --name=initial-install -p 8001:8001 marklogic:8.05-preinitializedDocker will respond with a container identifier.
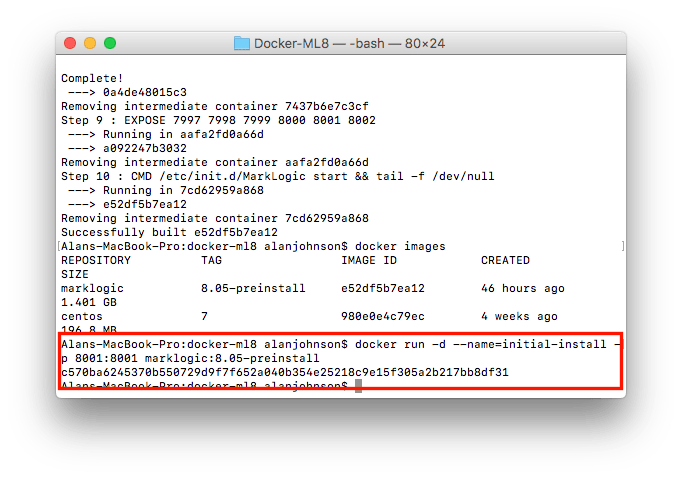
The command tells Docker to run this MarkLogic container in the background by using the -d flag. The name of the container will be initial-install. The container can be stopped, restarted and removed by referring to either its name or its container ID. The -p flag maps a host’s port to a container’s port. We are mapping port 8001 on the host computer to port 8001 in the MarkLogic container, the port for the Admin Interface in MarkLogic. Finally, we are specifying the container to be created from the image named marklogic:8.05-preinitialized.
After the container is created, simply point your browser to http://localhost:8001 then finish the rest of the MarkLogic post-installation steps.
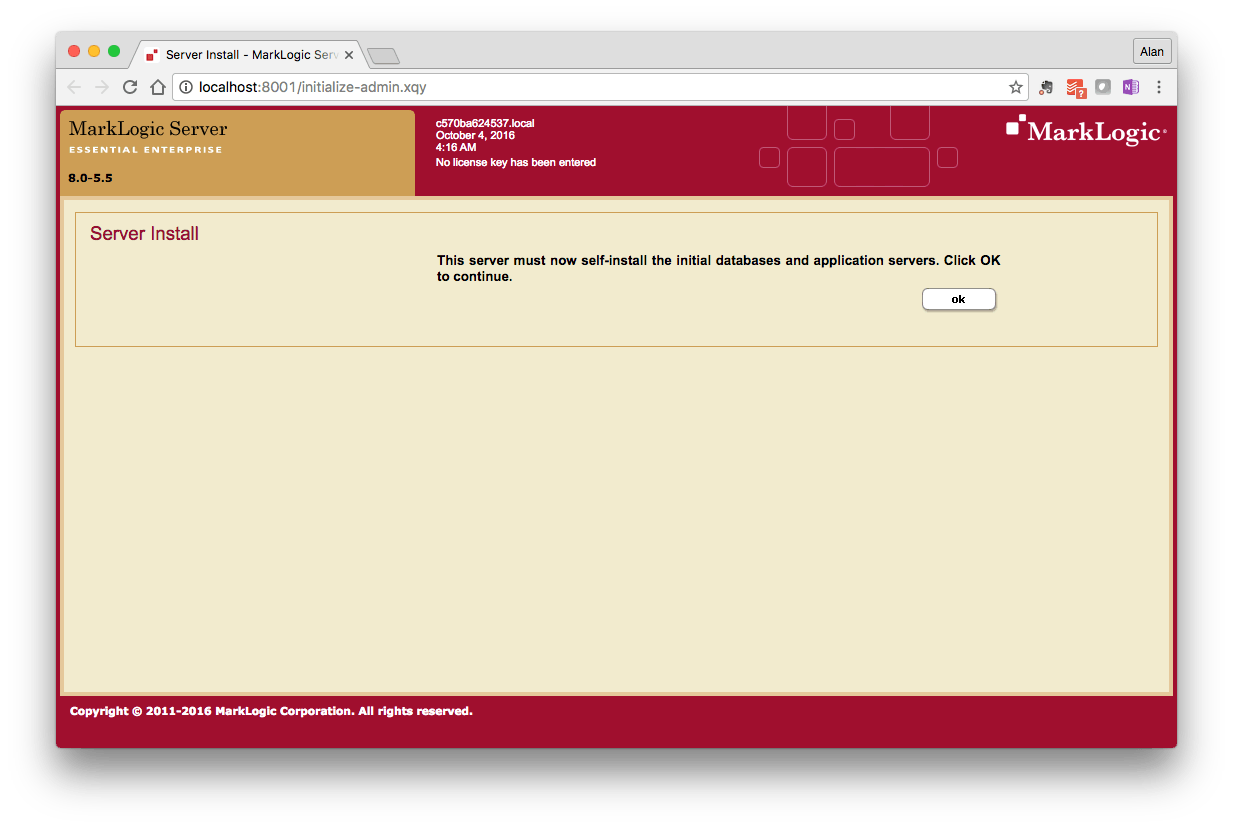
For this container, skip joining a MarkLogic cluster. Other docker run flags would be needed so that MarkLogic containers could communicate with each other. For more information on MarkLogic installation procedures, see the MarkLogic Installation Guide.
After completing the post-installation steps, create a new image for our installed version of MarkLogic. Type in the following:
docker commit initial-install marklogic:8.05-installed
This command creates a new image of MarkLogic with the post-installation steps completed. With our post-install MarkLogic image created, you might want to still keep the initial-install container running or you might choose to stop and remove it. We’ll use the marklogic:8.05-preinitialized image in a later example to create a MarkLogic cluster.
List all containers (currently running or stopped) by using the following command:
docker ps -a
We can stop containers then remove them with the following commands:
docker stop <name of container>docker rm <name of container>
Finally, create a new MarkLogic container that’s ready to use and enjoy:
docker run -d --name=mymarklogic -p 8000-8002:8000-8002 marklogic:8.05-installedReplace the original name of the container(mymarklogic) with whatever name you desire. The -p flag maps the host’s ports in the range of 8000 through 8002 to the container’s ports within the range of 8000 through 8002.
Did you know? You can access the shell prompt in your Docker container! Simply run the following docker command:docker exec -it [name of your container]sh
The -it flags tells Docker to run this command in interactive mode and allocate a pseudo-tty.
If we add new MarkLogic application servers, we need to create a new image that contains our changes. Then we need a new container that also maps those ports. We can follow this simple plan:
- Create desired MarkLogic App Servers and note the port number(s).
- Use
docker committo commit the container to a new image name. - Use
docker stopfollowed by the container to stop the container. - Then remove the container with
docker rmfollowed by the container name. - Finally, create a new container based on the newly committed image by using the
docker runcommand. The-pflag can be used multiple times with thedocker runcommand to expose your host’s ports to the new App Server ports in the container.
What about a Cluster of MarkLogic Containers?
Creating and using a MarkLogic Cluster with Docker for development and testing is much less taxing on your poor systems compared to creating 3+ virtual systems for the same task. But before we get started, we need to discuss a bit about Docker networking first. Like I’d mentioned before, Docker creates a subnet to manage network traffic between Docker containers, as well as between Docker containers and the host computer. This means that a subnet of IP addresses and host names are created and assigned to containers by Docker. But how does Docker know what containers should communicate with each other?
Linking Containers
You are the one who tells Docker how containers should communicate! When using the docker run command, you can also pass in a --link flag.
Consider the following examples:
docker run -d --name=marklogic1 --hostname=marklogic1.local -p 8000-8002:8000-8002 marklogic:8.05-preinitialized
docker run -d --name=marklogic2 --hostname=marklogic2.local --link marklogic1:marklogic1 -p 18000-18002:8000-8002 marklogic:8.05-preinitialized
The above create two MarkLogic containers. The second has the --link flag. Docker networking sets environment variables and the /etc/hosts file inside each container being linked along and also the linking container. This sets up the ability for Docker containers to communicate over the internal Docker network. The --hostname flag is used to be consistent with MarkLogic, which uses the full domain name when contacting other MarkLogic servers in the cluster. So we simply add the .local domain to the name of the container.
Finally, note the -p flag on the second container exposes the MarkLogic’s ports in the range of 8000 to 8002 to the host computer’s ports of 18000 to 18002. Why not use the host computer’s ports of 8000 to 8002? Because the first container is already using them. Remember, Docker shares networking with the host computer! But of course, you can choose any range of open ports on your host computer to map the container’s MarkLogic ports.
Now, simply point your browser to port 8001 in the first container (marklogic1) and go through the post-installation steps. Skip joining a cluster. When finished, point your browser to port 18001 for the second container (marklogic2) and go through the post-installation steps. When asked to join a cluster, simply use the host name of localhost and leave the port number at 8001. MarkLogic in the second container will contact MarkLogic in the first container. The configuration will be updated such that the marklogic2 joins the cluster with marklogic1. Create and add a third MarkLogic container, also linking it to marklogic1:marklogic1 and marklogic2:marklogic2 and you’ll soon have a proper 3-node MarkLogic cluster!
Using docker-compose
Docker has created another tool to aid in managing clusters of Docker containers. docker-compose has commands to create multiple containers and network them together. You can then create them, start them and stop them using docker-compose commands. Docker uses a file called Dockerfile to build containers. docker-compose uses a file called docker-compose.yml to build networks of containers.
docker-compose is available as a separate download.Let’s examine an example docker-compose.yml file used to create a MarkLogic 3-node cluster.
version: '2'
services:
  ml8node1:
    build: .
    image: ml8:build
    expose:
      - "7997"
      - "7998"
      - "7999"
    ports:
      - "8000:8000"
      - "8001:8001"
      - "8002:8002"
      - "8010:8010"
    hostname: "ml1.local"
    container_name: "ml1.local"
  ml8node2:
    image: ml8:build
    expose:
      - "7997"
      - "7998"
      - "7999"
    ports:
      - "18000:8000"
      - "18001:8001"
      - "18002:8002"
      - "18010:8010"
    hostname: "ml2.local"
    container_name: "ml2.local"
    links:
      - ml8node1:ml8node1
  ml8node3:
    image: ml8:build
    expose:
      - "7997"
      - "7998"
      - "7999"
    ports:
      - "28000:8000"
      - "28001:8001"
      - "28002:8002"
      - "28010:8010"
    hostname: "ml3.local"
    container_name: "ml3.local"
    links:
      - ml8node1:ml8node1
      - ml8node2:ml8node2
These docker-compose commands are similar in functionality to the Dockerfile we used to create a container. The current version of the docker-compose syntax is version 2. The .yml file begins with the version. Next, services define the three MarkLogic container nodes for this cluster.
- ml8node1
- The
buildcommand defines where theDockerfilefor this container is located. This line in the .YML file states theDockerfileis located in the current directory. - The resulting image will be tagged with the name
ml8:build. - MarkLogic ports 7997 through 7999 are exposed so the containers can communicate with each other.
- The host’s ports 8000 through 8002 are mapped to MarkLogic ports 8000 through 8002 in the container.
- The
hostnamedefines the networking hostname in the container so I’m using the full domain name including the.localto be consistent with standards and also MarkLogic.
- The
- ml8node2
- For the second MarkLogic Docker container, we are using the same
Dockerfileas the first MarkLogic node container. We are also using the remaining settings from theml8node1MarkLogic container definition with the exception for the following:ports– On the host side, ports 8000 through 8002 are being used byml8node1so we simply choose another port to contact MarkLogic’s Admin Interface, Query Console, etc. Forml8node2, we are using ports 18000 through 18002 to map to the MarkLogic ports 8000 through 8002 in the container.
links– Same as the--linkflag in Docker. We are linking theml8node2container to theml8node1container.
- For the second MarkLogic Docker container, we are using the same
- ml8node3
- Same options as
ml8node2above with the following differences. ports– Again, different ports on the host are being mapped to the MarkLogic ports in the container. we are using ports 28000 through 28002 to map to the MarkLogic ports of 8000 through 8002 in the container.links– we are linking to bothml8node1andml8node2.
- Same options as
The last step is to create the MarkLogic cluster, and we can very easily do that by using docker-compose commands. A list of most useful commands can be found below:
docker-compose up -d: Create the MarkLogic cluster defined in thedocker-compose.ymlfile. The-dflag runs the MarkLogic servers in the background.docker-compose stop: Stop all the MarkLogic servers in the cluster but don’t delete the Docker containers.docker-compose start: Start all the MarkLogic servers in the cluster again.docker-compose down --rmi="all": Stop and delete all the MarkLogic server Docker containers and also remove any created images.
After the containers have been created, started and linked together, simply point your browser to the Admin Interface port of http://localhost:8001 for hostname ml1.local, http://localhost:18001 for hostname ml2.local and http://localhost:28001 for hostname ml3.local, respectively.
Proceed through each node’s MarkLogic post-installation steps. The MarkLogic Installation Guide has more information on installation and adding a host to a cluster.
- On
ml1.local, skip joining a cluster. - On
ml2.localandml3.local, set the Host Name on the Join a Cluster page tolocalhostand leave the Admin Port at8001. - Accept the default settings on the next page.
- The next page confirms you are about to join a cluster.
- Configuration with the bootstrap host (first host in the cluster) is synchronized and the node becomes part of the cluster.
That’s a Wrap!
Now you have a cluster of MarkLogic servers! All-in-all, Docker is a great technology for developers, testers, technical learners, or anyone learning more about MarkLogic and its Enterprise features. It’s also useful in day-to-day development and testing activities. MarkLogic clusters can quickly be created, stopped and restarted again with lower impact on your computer’s resources than traditional virtual machines.
Enjoy MarkLogic and Docker!
Additional Resources
New to MarkLogic? Learn more about our NoSQL Enterprise Database at https://developer.marklogic.com/ or sign up for Free training at MarkLogic University. Sign up for our instructor-led or self-paced courses! View short videos at https://developer.marklogic.com/video/ or with the MarkLogic University Mobile app available on Apple’s App Store or on Google Play.
- Discover more administration topics in MarkLogic Administrator’s Guide.
- Learn about creating high availability for your data in your databases by viewing the MarkLogic University On Demand video Setting Up Local Disk Replication.
- Get more knowledge on MarkLogic Security with the On Demand Security series.
- Read this blog on Automating MarkLogic Docker Installs
- Read this blog on Creating an MLCP Docker container with pre-loaded data
- Read this blog on Deploying a Marklogic Cluster using Kubernetes and NGINX
- Read this blog on MarkLogic Docker Container on Windows
- View this webinar on Running Marklogic in Containers (Docker and Kubernetes)
Alan Johnson
View all posts from Alan Johnson on the Progress blog. Connect with us about all things application development and deployment, data integration and digital business.
Comments
Topics
- Application Development
- Mobility
- Digital Experience
- Company and Community
- Data Platform
- Secure File Transfer
- Infrastructure Management
Sitefinity Training and Certification Now Available.
Let our experts teach you how to use Sitefinity's best-in-class features to deliver compelling digital experiences.
Learn MoreMore From Progress


Latest Stories
in Your Inbox
Subscribe to get all the news, info and tutorials you need to build better business apps and sites